

Get Ready for Summer: Your Spring Home Insulation Checklist
Winter has already revealed where your home needs help.
Maybe your floors stayed cold, one room never warmed up, or the heater ran longer than you thought it would.
These weak spots become even more important as household costs keep rising. According to the ABS, living costs went up by 3.7% to 4.7% for Australian households in the year to June 2026.
Spring is a great time to fix these issues before your cooling bills go up.
The spots that let warmth escape in winter are often the same places where summer heat sneaks in.
Here are eight things to check before the weather heats up.
1. Start With the Rooms That Struggled Through Winter
You already learned a lot from the past few months.
- Which room took the longest to warm up?
- Did one end of the house cool down much faster at night?
- Did the heater go off, only for the room to feel cold again shortly afterwards?
These patterns can show where insulation is missing, where there are gaps or air leaks, or where insulation no longer covers the area well.
Heating and cooling can make up 20% to 50% of your household energy use in Australia, depending on where you live. If your home can’t keep a steady temperature, your systems have to work harder.
So before you buy the biggest air conditioner, try to find out why the room has trouble staying comfortable.
2. Check the Roof and Ceiling Before the Hot Weather Arrives
If you only check one thing this spring, start with the roof.
Your Home estimates that ceilings and roof spaces account for around 25% to 35% of winter heat loss. The same part of the building also takes a large amount of solar heat through summer.
Take a look at your current insulation and check for:
- obvious gaps between batts
- areas where insulation has shifted
- compressed or damaged sections
- missing insulation around framing
- evidence of water damage or pests
- areas disturbed during electrical or building work
Small gaps can make a bigger difference than you might think. Research from the Australian Modern Building Alliance found that gaps in fibreglass batts can lower their R-value by up to 32%.
But that doesn’t mean every roof needs brand new insulation.
Sometimes your current insulation still works well and just needs fixing in a few spots. In other cases, damaged or badly fitted insulation might need to be replaced.
If you are weighing that decision, whether to top up or replace roof insulation comes down to its condition, coverage, and how your roof is built.
If your home needs a bigger upgrade, improving roof insulation can tackle one of the main sources of heat loss or gain.
3. Those Cold Floors Were Telling You Something
Cold timber floors aren’t just something you have to put up with in winter.
Your Home estimates floors can account for around 10% to 20% of winter heat loss, particularly in homes with suspended floors.
If your floors felt cold each morning, check underneath them.
Homes built off the ground often have air moving through the subfloor. Missing insulation, gaps, or sagging material can make it much harder to keep your home at a steady temperature.
When summer comes, your floor is still part of what keeps heat in or out.
Good underfloor insulation helps cut down on heat transfer and stops unwanted air from moving under your home.
You don’t have to insulate everything at once. If you’re on a budget, it’s often better to fix one big problem area well instead of spreading your money across lots of small upgrades.
4. Did Winter Leave You With Damp Patches or Condensation?
This is one situation where it’s best to pause before adding more insulation.
If you noticed water droplets under the roof, damp timber, stains, mould, or a musty smell, you might have a moisture problem that needs fixing first.
A common example is warm air from inside moving into a cold roof space and hitting the underside of metal sheeting. Without good ventilation or moisture control, water can form on the cold surface and drip onto timber or insulation.
Condensation is affected by temperature, moisture, air movement, and ventilation.
Australian building research has treated this as a real issue for years. An ABCB study cited by the Australian Modern Building Alliance estimated that around 40% of new and existing Australian residential buildings using fibreglass batt cavity insulation, or no insulation, experienced interstitial condensation risk.
Air movement also plays a bigger role than many people realise. The same technical guidance notes that moisture carried by uncontrolled air leakage can exceed moisture movement through vapour diffusion by more than 100 times.
So don’t just cover up a moisture problem and hope it goes away.
Find the source of the problem first. Then look at insulation, ventilation, air sealing, and how the building is put together.
5. Look for the Gaps You Cannot Feel Until the Weather Turns
Insulation might look fine from a distance but still have lots of weak spots.
Most homes have pipes, wiring, downlights, ductwork, ceiling access panels, and framing. Each of these creates another spot where insulation needs to fit well.
Pay particular attention to:
- roof access hatches
- edges around ceiling insulation
- gaps near structural framing
- areas around ducts and services
- sections disturbed by previous trades
- obvious cracks or openings into roof or subfloor spaces
The Australian Government says that proper insulation in your roof, walls, and floors can cut your heating and cooling costs by more than 50%.
This number depends on your home, the climate, and how well your house already performs, but it shows why stopping heat transfer throughout the whole building is more important than just adding more cooling.
Spray foam can work well in tricky spots because it expands to fill odd shapes and helps stop unwanted air movement.
But it still needs to be right for your building.
Things like access, ventilation, moisture, your current insulation, and how your home is built all make a difference.
6. Check the Shed, Garage or Home Gym Too
Maybe winter showed you another problem outside your main house.
The backyard shed was too cold to work in.
The garage turned into a home gym, but no one wanted to use it before lunchtime.
The workshop was fine on mild days, but got uncomfortable whenever the weather changed.
Metal sheds usually start with very little insulation. Their thin roofs and walls heat up or cool down quickly with the weather.
If you use these spaces often, spring is a good time to add roof and wall insulation before the metal heats up in summer.
The best way to insulate depends on whether you use the space for storage, hobbies, exercise, a workshop, or something else.
If you rent, these checks can still help you spot problems, but talk to your landlord before making any permanent insulation changes.
7. Check Whether Your Existing Insulation Still Deserves Its Job
Just because insulation is old doesn’t mean it needs to be replaced.
What matters is its condition.
Ask yourself:
- Is it still sitting where it should?
- Does it cover the area evenly?
- Has water reached it?
- Have rodents or previous trades disturbed it?
- Are there visible gaps?
- Has it sagged or compressed?
Different types of insulation age in different ways, so you don’t always need to rip everything out and start over.
Sometimes it makes sense to just repair or upgrade certain areas.
If you’re not sure what you’re seeing, looking at the age and condition of the insulation can help you figure out how long it should last and if it’s still doing its job.
8. Spend Your Money Where the Home Needs It Most
This really matters when your household budget is tight.
You don’t have to treat insulation as an all-or-nothing project.
The Australian Government recommends insulating your roof, walls, and floors for the best results. But your budget might not allow for that right now.
Start with the area that needs the most attention.
If you see obvious gaps in the roof, fix those first.
If raised timber floors made winter uncomfortable, check the subfloor.
If an extension has no insulation, focus on that before fixing areas that already work well.
Some checks are easy to do yourself. Look for obvious gaps, insulation that’s out of place, damp spots, or areas that feel different from the rest of your home.
Call a professional if it’s hard to reach the area, if electrical work is involved, if you’re not sure about moisture problems, or if you’re thinking about spray foam or a big upgrade.
Spring gives you a chance to fix these problems before summer brings higher energy bills.
Quick Spring Insulation Recap
Before summer arrives, check:
- which rooms struggled most through winter
- the condition of roof and ceiling insulation
- cold floors and exposed subfloor areas
- condensation, damp, or staining
- gaps around services and access points
- sheds, garages, and other regularly used spaces
- whether existing insulation still sits evenly and performs as intended
- which problem area deserves your budget first
The goal isn’t to add as much insulation as you can.
It’s about putting the right insulation where your home needs it most.
Prepare for Summer, Not Higher Power Bills
At Tates Coating Services, we’ve been installing spray foam insulation and protective polyurethane coatings since the 1980s.
We’ve helped homeowners and businesses with everything from roof and ceiling insulation to walls, underfloors, and hard-to-reach areas.
If winter showed you weak spots in your home, spring is the perfect time to fix them before it gets hot.
Our trained, safety-conscious team is here to provide free information, advice, or a quote. Contact us and we’ll help you figure out which areas to tackle first.

Is Spray Foam Roof Insulation Worth It for Australian Homes?
Winter has a way of exposing every weak spot in a house. The extra jumper comes out. Doors close to keep warmth in. Someone grabs the blanket off the couch. The heater’s been running for hours, but one room still feels colder than the rest. That’s usually when homeowners start asking questions. Is the heater the problem? Are the old batts doing anything anymore? Or is the roof letting all the warmth out? That’s usually when spray foam comes into the conversation. Ask a neighbour, scroll Reddit, check a renovation Facebook group, or spend ten minutes on YouTube and you’ll find strong opinions in every direction. Some homeowners swear by it. Others say avoid it completely. So what’s the real answer? This guide breaks down where spray foam roof insulation makes sense, where it doesn’t, and what Australian homeowners should know before making the call.
Why Roof Insulation Makes Such a Big Difference
If your roof space feels like an oven in summer, that heat doesn’t politely stay up there. It pushes down into the rooms below. In winter, the opposite happens. Warm air rises, and if insulation underperforms, much of that warmth escapes through the top of the home. According to Australian government energy guidance, heating and cooling account for about 40% of household energy use. For many Australian homes, upgrading insulation can reduce heating and cooling costs by 10% to 30%. That’s why roof insulation is often one of the first places homeowners upgrade. If your home struggles to stay comfortable, improving your roof and ceiling insulation can make a measurable difference. But not all insulation works the same way. That’s when homeowners start comparing options, especially if standard insulation hasn’t solved the problem.
What Makes Spray Foam Roof & Ceiling Insulation Different
Traditional insulation like batts can do a good job, but only when it fits neatly and stays that way. Roof spaces are rarely neat. You’ve got pipes, wiring, downlights, ductwork, odd corners, and framing that doesn’t always line up cleanly. A few small gaps around those areas can be enough to let air move through, which means the insulation may look fine but still underperform. Spray foam works differently because installers apply it as a liquid. It expands into edges, gaps, and uneven spots before it sets into place. That gives it two practical benefits. It slows heat transfer and helps reduce unwanted air movement. For many homes, both batts and spray foam can work. The better choice depends on your roof and the problem you’re trying to solve.
| Insulation type | May suit | Limitations |
| Batts | Lower upfront budgets | Rely on neat fitting |
| Straightforward roof cavities | Can leave gaps | |
| Easy access roof spaces | May shift over time | |
| Simple ceiling insulation upgrades | Rodents can disturb some bulk insulation products | |
| Spray foam | Awkward roof spaces | Higher upfront investment |
| Leakage-prone areas | Requires specialist installation | |
| Long-term stability | Not appropriate for every roof type | |
| Hard-to-access cavities | Future access to services may need planning |
If you want the deeper technical breakdown, our complete spray foam insulation guide explains how the system works. So, where does that actually make sense?
 Where Spray Foam Roof Insulation Makes Sense
Spray foam is not a one-size-fits-all solution, but there are situations where it solves problems other insulation products struggle with.
- Older homes with inconsistent insulation: Older roof spaces often contain insulation that has shifted, sagged, deteriorated, or never properly covered the area, creating weak spots.
- Roof cavities with awkward access: Some homes have tight roof spaces where installing traditional bulk insulation neatly is difficult. Spray foam can be useful where access is limited or framing is irregular.
- Homes with noticeable drafts or uneven comfort: If one room always feels different from the rest, air leakage may be a contributing factor. Spray foam can help reduce that uncontrolled movement.
- Cathedral ceilings or limited cavity depth: Where thickness is restricted, insulation performance per thickness becomes more important.
- Retrofit upgrades: Existing homes often create practical installation constraints that new builds don’t. That can change what makes sense.
If you’re weighing alternatives, our spray foam vs batts comparison breaks down the differences. If spray foam sounds promising so far, this is usually where the practical questions start.
Does Spray Foam Cause Condensation Problems?
This is probably the biggest concern. The short answer? Not automatically. Condensation happens when moisture-laden air meets cooler surfaces under the right conditions. Poor ventilation, incorrect assembly design, hidden moisture problems, or the wrong insulation approach can all contribute. Spray foam itself is not the villain, and installation quality matters. So does roof design. That’s why the real question is not: “Is spray foam bad?” It’s: “Is my roof suitable for this type of insulation?”
Will Spray Foam Make the House Too Airtight?
This is often mentioned, but reducing uncontrolled air leakage is usually beneficial. It doesn’t mean sealing the home into an unhealthy environment. Homes still need proper ventilation, moisture management, and good insulation working together. The goal is controlled performance, not trapped stale air.
Can Spray Foam Damage Roof Timbers, Wiring, or Pipes?
It shouldn’t, as long as the roof is suitable and the job is handled properly. Leaks, moisture issues, damaged timbers, or faulty wiring should be fixed first. Insulation should never cover problems that still need repair. Spray foam bonds to the surface and forms a continuous layer, which is one reason it performs well in irregular spaces, as outlined in this spray polyurethane foam technical overview. That also means checking wiring, pipes, ducting, and anything that may need future access before spraying starts. That is why spray foam is not a DIY can-from-Bunnings job. A qualified installer should assess the roof space, plan around services, and confirm the area suits the product before application.
How Long Does Spray Foam Roof Insulation Last?
One reason homeowners consider spray foam is longevity. Unlike some fibrous insulation products, it doesn’t typically sag, slump, or shift when installed correctly. Performance lifespan depends on:
- installation quality
- roof condition
- exposure
- product selection
But properly installed spray foam is generally considered a long-term insulation solution. It usually doesn’t require ongoing maintenance, but roof spaces should be checked periodically as part of normal home maintenance, especially if leaks or other roof issues develop. Learn more: How Long Does Spray Foam Insulation Last?
When Spray Foam Is Probably Not the Right Fit
This is where it pays to be honest. Spray foam may not be the right option if:
- Insulation should never hide existing roof problems: leaks, moisture issues, or structural damage should be fixed first.
- Budget is your main concern: batts or other systems may be a more practical starting point.
- Your roof needs a specific moisture strategy: some roof assemblies require a different insulation approach.
- Your home has heritage or upgrade restrictions: not every structure suits spray foam.
- Future access to the roof space matters: planned electrical or plumbing work should be considered.
- A simpler fix may solve the issue: not every comfort problem needs premium insulation.
That’s why blanket recommendations are rarely helpful.
So, Is Spray Foam Roof Insulation Worth It?
For the right Australian home, yes. Especially where:
- traditional insulation has underperformed
- roof geometry is difficult
- air leakage affects comfort
- long-term performance matters
But “worth it” depends on the home, the roof, and the actual problem you’re trying to solve. If your heating or cooling seems to be working harder than it should, the roof may be part of the story. At Tates Coating Services, we help homeowners understand what’s happening before recommending an insulation solution. That starts with clear advice, not guesswork. If you’re unsure whether spray foam roof insulation suits your home, get in touch for a free consultation. We’ll talk through your roof space, your comfort issues, and what options make practical sense.

The Heater’s Running. The Bill’s Rising. The House Still Feels Cold.
This winter, that dreaded power bill could feel heavier than ever.
Global energy pressures, fuel price swings, and rising living costs are already making households more cautious.
The ABS reported that annual CPI rose 4.6% in the 12 months to March 2026, the highest rate since September 2023.
Then winter hits, and we’re spending more time indoors.
The Ugg boots come out. The extra jumper stays on. Someone grabs the blanket from the couch and still says, “Why is this house so cold?”
In many homes, the problem isn’t the heater itself. It’s how fast the heat escapes.
Warm air leaks out through the roof, walls, gaps, and often the floor. So the heater runs longer, the temperature drops faster, and the cost builds without much comfort to show for it.
In this guide, you’ll learn where homes lose heat, how insulation helps, and what can make the biggest difference before winter.
Let’s get started.
Why Heating Feels More Expensive This Winter
When costs rise everywhere, small leaks at home matter more.
Energy.gov.au recommends setting the heating between 18°C and 20°C in winter. Every degree higher can add 5-10% to energy costs.
That matters when your home loses heat quickly.
You turn the heater up. The room warms for a bit. Then the heat disappears again.
That cycle usually points to poor house insulation, air gaps, or older insulation that no longer performs as it should.
Where Homes Lose Heat (What Most People Miss)
Most people start by checking the roof, which makes sense.
Warm air rises, so roof and ceiling insulation play a big role. But heat loss does not stop there.
It can happen through:
- Roof and ceiling spaces
- Wall cavities
- Gaps around doors, windows, and vents
- Raised timber floors
- Underfloor areas with open airflow
That last one gets missed often.
Cold air moving under your home can pull warmth through the floor. This is why some homes feel cold from the ground up, even with the heater running.
Homes without underfloor insulation often feel this first in bedrooms, living rooms, and older timber-floor areas.
Why Insulation Makes a Bigger Difference Than Turning the Heater Up
Turning the heater up treats the symptom.
Insulation deals with the cause.
Energy.gov.au says installing the right insulation in roofs, walls, and floors can save more than 45% on heating and cooling costs.
For example, if your winter electricity bill is $400, you could save up to $180. Suddenly, the difference feels much more tangible.
That does not mean every home gets the same result. Access, materials, climate, and installation quality all matter.
But the principle is simple.
If your home holds heat better, your heater does less work.
Draught proofing also plays a part. Air leaks alone can account for up to 25 per cent of heat loss in winter.
That’s why insulation and air sealing work best together.
Why Spray Foam Insulation Works in Real Homes
Older homes often have tricky spaces.
You might find uneven framing, tight roof areas, old batts, gaps around pipes, or underfloor spaces that are hard to reach.
Traditional insulation can work well, but it needs a clean fit. Gaps and movement reduce performance.
Spray foam insulation works differently.
Installers apply it as a liquid. It expands into gaps, sets in place, and helps reduce both heat transfer and air movement.
That makes it useful in:
- Roof spaces with awkward framing
- Underfloor areas with open airflow
- Wall cavities during renovations
- Gaps around services and penetrations
It is not the right answer for every home. But where access is difficult, or air leaks are part of the issue, spray foam can solve problems that batts often miss.
Read more: A Complete Guide to Spray Foam Insulation

source: yourhome.gov.au
Check the Areas That Cost You Most First
You do not need to upgrade the whole house in one go.
Start with the areas causing the biggest comfort problem.
If your floors feel cold, check the subfloor.
If upstairs rooms overheat and cool quickly, check the roof space.
If one room never holds temperature, look for gaps, missing insulation, or old materials.
The best starting point depends on your home.
For older homes with suspended timber floors, the subfloor often gives clear signs. Cold boards, draughts, and rooms that drop in temperature overnight usually point to the underside.
Source: yourhome.gov.au
Winter Tips That Go Beyond “Put On a Jumper”
Small changes won’t replace insulation, but they can help reduce energy use.
Try these, including a few you might not have considered:
- Set your thermostat between 18°C and 20°C
- Close doors to rooms you’re not using
- Open curtains during the day and close them at night.
- Seal gaps around doors, floors, and skirting boards
- Turn heaters off when they’re not needed
- Insulate hot water pipes with foam sleeves.
- Use door snakes at external and internal doors.
- Install removable window insulation film on older windows.
- Cover unused fireplaces or chimneys to stop draughts.
- Use rugs over bare floors, especially at night.
Each degree above 20°C can increase energy use by 5 to 10 per cent, so small adjustments make a difference over time.
These steps work best when your home already holds heat well.
If cold floors are part of the problem, our guide on underfloor insulation and home energy efficiency explains how the subfloor affects comfort.
When Old Insulation Stops Doing Its Job
Insulation doesn’t always fail overnight. It gradually loses performance.
Common issues include:
- Sagging or gaps
- Moisture damage
- Dust build-up
- Pest activity
- Poor original installation
Many older homes have insulation that no longer performs the way it should.
If it hasn’t been checked in years, it’s worth reviewing before winter gets colder.
A Warmer Home Starts With Less Heat Loss
If your home still feels cold even when the heater is running, the issue is usually how quickly heat is escaping.
Fixing where that heat is going often makes a bigger difference than increasing your heating.
For many Western Australian homes, especially older ones, that means better comfort, fewer draughts, and less reliance on heating.
If you want to understand where your home is losing heat and what options make sense, start by looking at the areas that matter most.
Ready to decide? Here’s what to do next
We hope this gave you a clearer picture of why your home may feel cold, even when the heater is running.
Spray foam isn’t the right fit for every home, but when used in the right areas, it can solve problems that other insulation types can’t. Knowing where it works best helps you make a more informed decision.
At Tates Coating Services, we’ve been installing spray foam insulation and polyurethane coatings across Western Australia since the 1980s. Our work covers homes, farms, commercial buildings, and industrial sites.
Whether you’re building, renovating, or improving an existing home, we can walk you through your options and help you understand what will actually make a difference.
If you want a clear answer or a quote, get in touch. No pressure. Just practical advice to help you move forward. Click here to get a free quote.

A Complete Guide to Spray Foam Insulation [2026]
You’ve probably heard people talk about spray foam insulation.
Maybe your neighbour says their house is quieter and stays cooler, saving up to $1,000 a year on cooling costs. Or maybe you’re tired of a home that never keeps a steady temperature, even after spending on batts, curtains, and running the air conditioner.
You are not alone. Many people end up in the same spot.
Spray foam is not perfect for every home and may not always be the best option. But when designed and installed properly, it can solve problems other insulation cannot, especially in hard-to-reach places, areas with moisture issues, and spots where air leaks are common.
This guide explains what spray foam is, where it works best, how much it costs, and what to expect if you are planning an upgrade or renovation.
Let’s dive in.
What is spray foam insulation?
Polyurethane spray foam is a type of insulation that installers spray as a liquid onto surfaces. The liquid expands, sets, and hardens, forming a thermal barrier that helps keep heat in or out of a building. It also acts as an air barrier, a vapor retarder, and sometimes structural reinforcement.
Spray foam can be used for insulation in walls, roofs, attics, and underfloors. It creates an airtight seal, so drafty hallways become a thing of the past. In winter, rooms stay cosy without constantly adjusting the thermostat. In summer, your house feels cool, reducing stuffy, hot spaces. This improves your home’s energy efficiency by retaining the ambient temperature.
A chemical combination of polyol resin and isocyanate makes the hardened foam. When combined, they react and expand to 30-60 times their original liquid volume. All products are safe once applied. After installation, any early odour from the foam usually dissipates quickly with proper ventilation. The formulation minimizes off-gassing, so you can feel confident about air quality. There are no known long-term health risks once the foam has fully cured and settled.
What makes spray foam different from batts and boards?
Batts and boards can work well, but they rely on a neat fit and ideal environmental conditions. Gaps around wiring, pipes, and uneven framing can leave small air paths behind. Combined, these gaps can equal a basketball-sized hole in the average ceiling, letting conditioned air escape and increasing energy costs. Environmental conditions such as air flow and moisture in the air can significantly reduce the thermal performance of batts by up to 60%.
Spray foam fills the cavity and locks into place once it cures. It does not sag or shift like some bulk insulation can over time.
If you want a simple comparison, this article explains where spray foam and batts differ in real homes.
Read more: Should I Use Spray Foam or Batts for Insulation? Get The True Facts
So, before you make a home-changing choice, let’s run through a quick guide to the two types of spray foam insulation.
The 2 types of spray foam insulation
There are two main types of spray foam insulation: open cell and closed cell. Both come as liquids that, when mixed, create an expanding foam. Each type has particular traits. The two types are:
Open Cell Foam
Open cell foam is a good option for areas that are hard to reach or irregularly shaped. Its sound reduction properties are also a benefit in places with high traffic or aircraft noise. In Australia, there is usually no price difference between open and closed cell foam. However, in some regions or specific applications, such as high-moisture environments or where structural strength is needed, closed cell foam can be more expensive because of its superior properties.
Open cell foam is a good choice in these situations:
- This spray foam is more flexible than closed cell insulation, so it’s best in areas where movement is expected or settling is needed.
- It’s easier to use in awkward shapes, like hard-to-reach spaces around pipes or near wiring.
- Its soundproofing properties are slightly better than closed cell foam.
Closed Cell Foam
Closed cell foam creates a more effective thermal break than open cell foam. It acts like an extra layer of plywood, improving support with its rigidity and strengthening overall durability. This rigid material also keeps water out. Closed cell can be applied thinly, so it does not allow rodents to burrow in it or take up excessive space.
Closed cell spray foam insulation is denser and has a slightly higher R-value. It’s popular in residential applications such as basements, crawl spaces, and exterior walls. It’s also widely used in commercial and industrial construction. When finished, it can have a neater appearance.
Here’s why we recommend people choose closed cell spray foam insulation:
- It has a higher R-value per inch than open cell spray foam insulation, providing better thermal resistance.
- This insulation adds structural strength to a building, making it suitable for use in load-bearing walls and other areas where added strength is valuable.
- It’s highly effective in areas where air leakage is a concern.
- Closed cell is resistant to moisture and should help prevent mould growth in crawl spaces and basements.
- It’s more durable than open cell spray foam insulation and more robust in high-traffic areas.
- It can be applied at minimal thickness, taking up less space and stopping rodents from making a home in it.
| Cost factor | Open-cell foam | Closed-cell foam |
| R-value per inch* | 0.65 | 1.11 |
| Expansion | Expands 1000% | Expands 300% |
| Density (per m3) | 10 Kg / m3 | 32-40 Kg / m3 |
| Moisture barrier | Semi-permeable | Impermeable |
| Vapor retardant | Semi-permeable | Impermeable |
| Sound dampening | Excellent | Good |
* R-Values fluctuate depending on specific product utilised.
Read more: Open Vs. Closed Cell Foam – A Must-Read Comparison Guide
How does spray foam insulation work?
Spray foam insulation starts as two liquids that mix at the spray gun. Once sprayed onto a surface, the materials react and expand quickly, filling the space you want to insulate.
As the foam expands, it pushes into small gaps and cracks that batts and boards often miss. Then it cures and bonds to the surface, forming one continuous layer of insulation.
Installers build up the final thickness in passes. This helps control depth and coverage, especially in roof spaces, wall cavities, and underfloor areas where framing and services make neat fitting difficult.
The practical benefit is that spray foam does two jobs at once. It slows heat flow and reduces unwanted air movement through the insulated area. That sealing effect is why spray foam can feel different in daily comfort compared to insulation that only fills a cavity.
Now that you know how spray foam works, let’s look at what that actually means in a real home. Here are the main benefits people notice once it’s installed.
The benefits of spray foam insulation
Spray foam insulation offers many benefits for homeowners, which is why more people in Australia are choosing it. Here are the main reasons to consider spray foam insulation:
- Increased Energy Efficiency: Spray foam insulation helps keep heat inside during winter and blocks it out during summer, lowering your energy bills. Its higher R-value compared to most traditional insulation keeps your home’s temperature steady.
- Environmental Protection: Manufacturers make spray foam from polyurethane without ozone-depleting chemicals, making it safe for the environment. Its durability means less waste over time. Compared to traditional insulation like batts, spray foam can lower greenhouse gas emissions by up to 30% over its lifetime, reducing your home’s environmental impact.
- Increased Comfort and Indoor Air Quality: Spray foam insulation creates an airtight seal that stops drafts and keeps your home’s temperature steady. It also helps keep out dust, allergens, and other pollutants, making the air inside your home cleaner. This is especially helpful for people with allergies or breathing problems.
- Longevity and Durability: Spray foam is tough and stands up well to water, mold, and pests. Unlike other insulation that can sag or settle, spray foam stays effective for decades. When installed correctly, it can last up to 80 years, giving your home long-term protection and support.
- Superior Soundproofing: Because spray foam is dense and expands to fill gaps, it helps block out noise. This makes it a good choice if you live in a noisy area or want a quieter home.
- Seamless Installation and Versatility: Spray foam sticks to uneven surfaces and fills all the gaps, leaving no spots uncovered. This makes it useful for many parts of your home, like roofs, walls, and under floors.
One of the best things about spray foam is that it creates a solid barrier against air and moisture. This not only helps save energy but also makes your home stronger. Because it covers everything, you won’t have to worry about leaks, drafts, or cold spots that can happen with other insulation.
Choosing spray foam insulation makes your home more comfortable, energy-efficient, and environmentally friendly. You can save on heating and cooling bills, help the environment, and make your home healthier. For example, cutting your energy bill by 25% each year could add up to big savings over a decade. Think about what you could do with that extra money.
1. Site Preparation
Before any spraying begins, installers must prep the area.
Installers will:
- Clear the work zone of loose debris and personal items.
- Look for moisture problems or structural issues.
- Cover nearby surfaces and windows to protect from overspray.
- Check access to the areas being treated, like roof voids, underfloors, or cavities.
You may be asked to vacate the space during this part if the work zone is inside the home. You should also keep pets away from the site.
If the project involves a new build or renovation, the space needs to be weather-tight but not lined. If you’re retrofitting, installers may need to remove partial walls or ceilings, depending on the access points.
2. Application of Spray Foam
Once the area is ready, installers suit up and start the process.
- Installers apply spray foam on-site using specialised equipment responsible for mixing two liquid components: polyol and isocyanate.
- The installer sprays the foam directly into the cavity or onto the surface.
- The foam expands rapidly to fill gaps and sets in place within seconds.
Installers apply it in layers or passes to manage expansion and achieve the right thickness.
Expect some noise from the pump and compressor setup. It’s not loud enough to cause damage, but it might be noticeable if you’re nearby.
3. Curing and Ventilation
Spray foam sets quickly, but it still needs time to cure completely.
- Most modern formulations are touch-dry within seconds.
- Full curing takes only minutes , depending on conditions.
- Ventilation is important during and after application to disperse any chemical odours.
Installers may recommend staying out of the space for a few hours after the job finishes. If it’s a large area or enclosed zone, they’ll often use extraction fans to speed up the process.
Once cured, the foam is inert and safe.
4. Access and Re-entry
For residential jobs, you might need to stay out of affected rooms for a short period — usually around 2 to 24 hours, depending on the scale and location.
In commercial or new build settings, this isn’t usually a concern since other work is happening around the insulation.
If installers are working underfloor or in roof spaces, they may restrict re-entry to those areas until they give the all-clear.
5. Aftercare and Clean-Up
Professional teams will tidy up once the foam is in place. You should not have to deal with overspray, leftover drums, or mess.
What they’ll check before leaving:
- Foam thickness and coverage
- Seal integrity
- Signs of shrinkage or pull-away (rare but needs correction if it happens)
- Access points are safely closed or secured.
Installers may advise you to avoid painting or drilling into the foamed area for a set period. If you plan to line or cover the area, ask about any wait times or product compatibility.
How much does spray foam insulation cost?
The cost of spray foam insulation varies depending on factors like the type of spray foam, area to cover, R-value, and labour costs. Other variables can affect the overall cost, but we’ll get into that shortly. First, here’s a ballpark estimate of your required investment.
Australians can expect to pay $1,800-$7,000 for spray foam insulation installation. .
The cost of installing insulation under floors or in ceiling areas is around $35-$40/m² but is always relevant to the customers desired thickness of application, and from $35/m² for walls in Australia depending on method of application. The difficulty of installation determines the cost. An average home in Western Australia is 214.18m². Here’s what you can expect to pay to insulate a ceiling or floor depending on your home type.
| Home type | Size square meters | Average Cost |
| Apartment | 50 | $1750 |
| Small house | 125 | $4375 |
| Mid-size house | 200 | $7000 |
| Large house | 250 | $8750 |
Spray foam insulation contractors often provide an all-inclusive price, but check this carefully before accepting an offer. Some companies add labour costs ranging from $50-$80 per hour.
While this investment is higher than common varieties like batts, the advantages should outweigh upfront costs over time. Spray foam’s superior insulating properties and long lifespan are important to consider.
Read more: Should I Use Spray Foam or Batts for Insulation? Get The True Facts
Factors that affect the cost of spray foam insulation
- Type of foam: There are two main spray foam insulation types: open cell and closed cell. Both come as liquids that, when mixed, create an expanding foam. These different foams then contain varying properties that can then be utilised and considered when applying to each scope of work. .
- Size of home: The area to insulate has a significant impact on project costs. A larger home requires more insulation materials and additional labour. Complex architectural features, such as vaulted ceilings or multiple levels, can also make the job more time-consuming.
- R-value: R-value measures a material’s thermal resistance or insulating ability. The higher the R-value, the more effective and expensive the product will be.
- Cladding: The type of cladding used on a building impacts installation costs in terms of accessibility, potential damage, and compatibility. It also dictates whether the installer needs to drill holes to access the space.
- Climate: It is often more expensive to install spray foam insulation in areas that reach extremely high or low temperatures.
- New vs. old home: Insulation costs are typically lower if it’s a new home being built. There is unrestricted access to recesses that are much harder to reach in a completed house.
- Space availability: Areas like tight crawl spaces make installing insulation more difficult and time-consuming, which increases the overall cost.
- Labour costs: These may vary depending on who provides the service and their experience level.
- Other costs: Additional costs, such as equipment and permits, could also affect the overall project budget.
Tip: Try to budget an additional 7-15% on top of what our calculator gives. Difficult configurations, patterns, and added complexity will increase costs.
DIY spray foam insulation cost
Some homeowners choose the DIY route to install spray foam insulation. Take extreme care if you choose this option, as incorrectly mixed chemicals can cause harm. Always follow safety best practices and read the manufacturer’s instructions carefully.
You can purchase spray foam insulation kits from reputable providers, and they’re more affordable than hiring an expert installer. A 40L Polyurethane Foam Mix Kit will cost around $900-$1,000 as a retail product.
These take-home kits usually include:
- Quick-cure polyurethane foam
- A dispensing spray gun
- An ISO (A) cylinder
- Spray fan nozzles
- Polyol (B) cylinder
- Cone spray nozzles
- A gun hose
A standard kit should allow you to insulate an area of 18.6m² at a thickness of 25 mm.
Read more: The Real Truth Behind DIY Home Insulation Kits.
What is the best time of year for insulating your house?
There’s no bad time to insulate, but the best time depends on your location and goals.
Here’s a breakdown:
Summer (Ideal for Winter Prep):
- Get ahead of the winter rush.
- Insulate before the cold arrives.
- Best for underfloor insulation to reduce winter chills.
Winter (Ideal for Summer Prep):
- Install ceiling and roof insulation before the summer heat hits.
- Spray foam works well in colder weather.
- Avoid the spring and summer demand surge.
According to Energy.gov.au, sealing air leaks and upgradinginsulation before winter can reduce energy use by up to 45%, providing significant savings for Australian homes.
How to choose the right insulation contractor
Choosing the wrong insulation contractor often costs more later. Poor workmanship leads to draughts, moisture problems, and higher energy bills. Fixing these mistakes can be expensive.
Whether you’re building new or upgrading your home, the right installer should make things straightforward.
Here’s how to choose the right insulation contractor:
Qualifications and Compliance
Look for someone trained in spray foam systems and who understands ICANZ, BCA, and safety rules. General trade experience is not enough.
Experience Across Projects
Each site has different needs. Ask if they’ve worked on homes, commercial sites, or agricultural sheds like yours. A contractor with broad experience is more likely to manage challenges without delay.
Product Knowledge
They should clearly explain the products they use, how long they last, and whether they meet Australian standards. They should also provide information about warranty coverage and any aftercare services. This will help you understand what to expect in terms of product service life and maintenance. Ask if the product suits your climate and building type.
Transparent Pricing and Advice
Contractors should provide itemised and transparent quotes. A professional will explain potential costs and give you time to make a decision.
Reputation and Reviews
Genuine feedback matters. Look for verified reviews and real project examples. Case studies or photos confirm they’ve done similar work before.
Safety and Jobsite Readiness
Installers must carry insurance and follow correct safety procedures. They should work neatly and safely around other trades as needed.
Education, Not Just Installation
The best contractors take time to explain how insulation works, what to expect, and which options make sense for your home.
Red Flags to Watch For
Be cautious if they give vague answers, avoid showing past work, or push for quick decisions. A good contractor gives clear information and builds trust from the start.
Ready to decide? Here’s what to do next
We hope this guide gave you the clarity you were looking for.
Spray foam isn’t the answer for every build, but when used correctly, it solves problems other insulation types can’t. Whether you’re still weighing it up or already planning your next steps, knowing how it works and where it fits makes a difference.
At Tates Coating Services, we’ve been installing spray foam insulation and polyurethane coatings across Western Australia since the 1980s. Our work spans homes, farms, retail spaces, and industrial sites. Clients include names like BHP, ALCOA, FMG, and McDonald’s, but we’re just as committed to helping homeowners get it right the first time.
Whether you’re building, renovating, or retrofitting, our experienced team can walk you through your options. We’ll help you understand what’s possible, what to avoid, and what’s worth spending on.
If you’d like a quote or need a straight answer before making a decision, we’re here to help. No pressure. No sales pitch. Just the facts you need to plan with confidence. Click here to get a free quote.

Wall Insulation: The Smart Way to Keep Heat Out and Comfort In
You can feel it on a hot day.
Some rooms heat up fast, and the air con works overtime. Then the next power bill hits.
Much of that heat comes through your walls.
Without insulation, heat flows in and out all year, making your home harder to cool and harder to warm.
The fix is simple: proper wall insulation.
It can cut heating and cooling costs by around 15%, and it makes every room feel more stable and comfortable.
What Type of Insulation Is Best for Walls?
The best insulation depends on your wall type and climate, but most Australian homes use a mix of bulk batts, rigid foam boards, spray foam, or cavity fill.
Spray foam insulation seals and insulates in one step, filling every gap that leaks air. It suits older homes with uneven framing, tight cavities, or hard-to-reach areas. It gives a strong thermal seal and reduces drafts and moisture.
Bulk batts are the most common and affordable option for new builds or open wall cavities. Rigid foam boards work well for external applications or areas where you need to reduce thermal bridging.
Each material works differently. The best choice depends on your wall type and how your home handles heat.
Let's look at how insulation works for different wall types and how you can choose the right setup for your home.
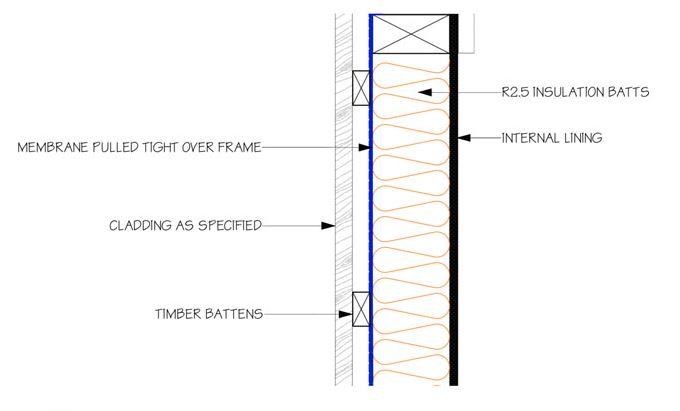
Waterproof vapour-permeable wall membrane and bulk insulation under weatherboard
Source: Envirotecture
Weatherboard Walls
Uninsulated weatherboard walls have a total thermal resistance of approximately R0.45, which is insufficient for comfort or energy savings.
Adding insulation lifts that number and helps your home stay steady in both hot and cool weather.
Use a vapour-permeable membrane over the outer frame to protect against moisture.
Spray polyurethane foam between the stud work and directly onto the external cladding or fit bulk batts snugly inside the cavity with no gaps. Even small spaces let in more heat than you think.
Brick Veneer Walls
Brick veneer walls also have a thermal resistance around R0.45, but they behave differently. In summer, the bricks absorb heat through the day and release it into your home during the evening.
Spray foam insulation can be sprayed directly between the studwork during construction. The foam can be sprayed at various thicknesses by either filling the cavity or leaving a space that can be used for running services.
Alternatively, add batts between the studs, fitted to the depth of the wall frame. For better performance, a rigid foam board can be installed in the cavity between the bricks and the frame. In cooler regions, a foil-faced option helps reflect heat inward.
Always tape wall-wrap joints securely, overlap at least 100mm, and keep the wall cavity clear for airflow and brick ties.
Installing insulation outside the studs helps stop thermal bridging and boosts the R-value. PIR, PUR or XPS boards all work well.
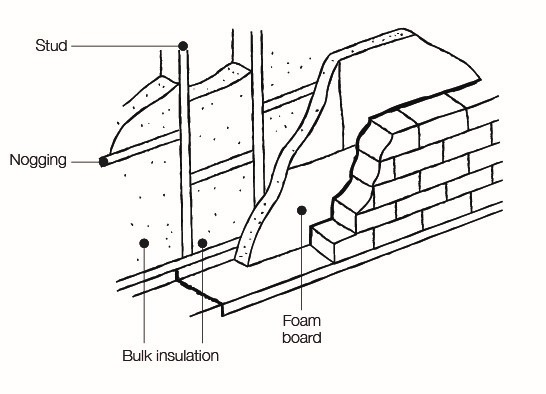
Brick veneer with foam board and/or bulk insulation
Source: Your Home

Cavity Brick Walls
Cavity brick walls have around R0.45 resistance on their own, so extra insulation is needed. The two main options are foam boards or cavity fill insulation.
Cavity fill suits existing double-brick homes and lifts resistance to about R1.3, depending on cavity width. Check local rules. The product must be water repellent and properly installed to prevent moisture issues.
Foam boards with reflective surfaces work best when there is an adequate air gap between the board and the brick. Follow the manufacturer's instructions for spacing and installation in your climate zone. Polyurethane spray foam can also be used to fill hard-to-reach wall cavities, providing both insulation and an airtight seal.
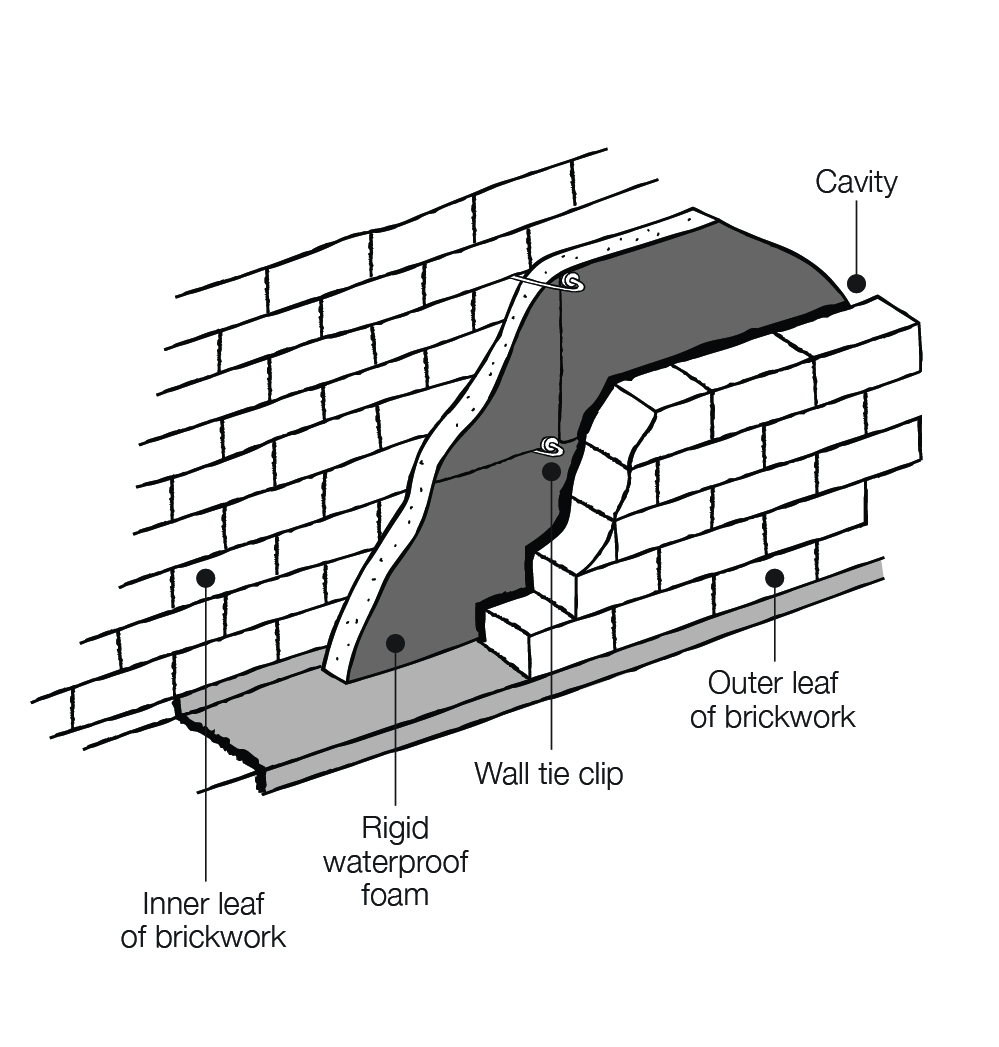
Cavity brick wall with extruded foam.
Source: Your Home
Solid Walls
Solid walls include concrete, brick, rammed earth, stone, and blockwork.
They have low thermal resistance (R0.3–R0.4), so they usually need extra insulation.
You can insulate solid walls inside or out, but do not insulate the inside if the wall is used for thermal mass, as it blocks its natural ability to store and release heat.
Suitable materials include polyurethane spray foam, rigid foam boards, bulk batts between battens, and foil-faced foam boards with an air gap of at least 15mm, with the foil facing inwards. These can be vapour-permeable or vapour-impermeable, depending on your location.
Externally, polystyrene cladding with render offers a smooth, durable finish that also enhances thermal performance.
Spray foam suits solid or framed walls where standard materials do not fit. It forms a continuous layer that strengthens walls and blocks air leaks.
Internal Walls
You only need to insulate internal walls that are adjacent to uninsulated or unconditioned spaces, such as garages, laundries, or storerooms.
For internal walls, plasterboard bonded to spray applied rigid foam is also a good choice, offering a clean finish and improved performance. The required R-value varies depending on the design and climate.
Use the same insulation level as your external walls to maintain even indoor temperatures throughout the home.
Internal walls can also be insulated if there were specific rooms that would like to be kept at a certain temperature, for example the opposing side of a kitchen can be a common requirement. Insulating internal walls with PU spray foam can also be an option to improve sound absorption between rooms.
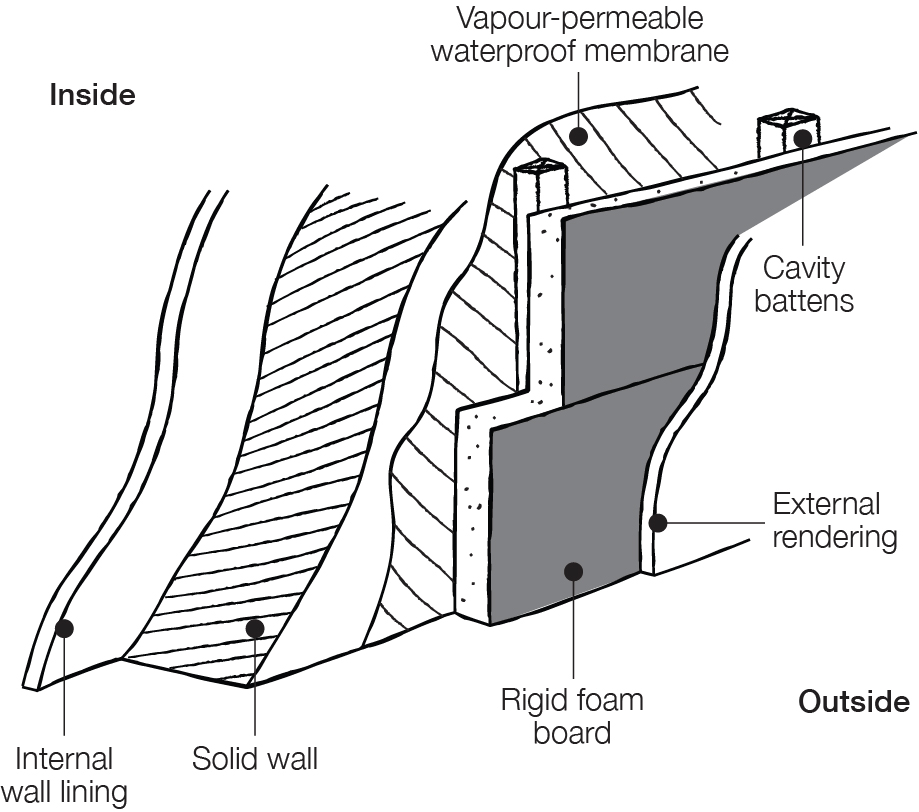
Solid wall with external polystyrene and render.
Source: Your Home
How Can I Insulate My Walls Cheaply?
For a budget option, start with easy-to-access areas like roof spaces, garages, or rooms under renovation.
Even small upgrades, like sealing wall gaps and adding reflective wraps, can lower your bills and improve comfort.
Keep Comfort In and Costs Down
Wall insulation keeps your home comfortable year-round and helps cut energy bills.
If your walls are still uninsulated, now is the time to act.
Contact us today for expert advice, clear answers, and a solution for your home insulation.
Related insulation services: roof insulation, underfloor insulation and residential insulation solutions.

How to Save Energy and Reduce Your Electricity Bill
In WA, energy bills can spike whether you are cranking the heater in winter or running the air conditioner in summer.
A poorly insulated or draughty home is often the hidden cause.
The good news is that a few smart upgrades can make a big difference to your comfort and your budget, no matter the season.
Why Home Insulation Is Essential for Lower Power Bills
Insulation is one of the most effective ways to maintain a stable indoor temperature.
It helps retain warmth during winter. It also keeps the heat out during summer. This applies to your roof, walls, and underfloor areas. All of these can quickly lose or gain heat if left unprotected.
If your insulation is old, damaged, or missing in key areas, it may be time to upgrade. Installing modern, high-performance materials such as spray polyurethane foam can seal gaps, reduce airflow, and improve energy efficiency.
Read more: No Underfloor Insulation? You're Paying for It Every Month
Easy Ways to Find and Seal Draughts
Even small gaps can make your heating or cooling systems work harder.
Check around vents, skirting boards, doors, and fireplaces for cold air in winter or hot air in summer.
Simple fixes like sealing gaps or adding door draught stoppers can make a noticeable difference in comfort and energy use.
Energy-Efficient Window Solutions for Your Home
Windows are one of the main points of heat transfer in a home. In winter, you may feel the chill radiating from them. In summer, they can let in excess heat.
To improve efficiency:
- Make sure windows close and seal properly.
- Consider double glazing or window films for better insulation.
- Use thick blinds or curtains to help regulate temperature indoors.
Seasonal Energy Efficiency Tips for WA Homes
- Use Heating and Cooling Systems Efficiently
Maximise the performance of your heater or air conditioner by keeping conditioned air inside. Seal gaps around doors, floors, windows, and skirting boards.
During summer, close curtains or install external shading to block the sun. For long-term savings, insulate ceilings, walls, and floors. This is an excellent first step if you are starting an energy efficiency upgrade.
- Seal Draughts and Prevent Heat Transfer
Reduce heat loss in winter and heat gain in summer by installing door seals, window seals, and underfloor insulation. Addressing these areas makes your home easier to heat and cool.
- Reduce Hot Water Consumption
Hot water accounts for around 29% of the average household's energy use.
- Run dishwashers and washing machines only when full.
- Use energy-saving settings.
- Take shorter showers and wash clothes in cold water.
- Turn Off Appliances and Lighting When Not in Use
Appliances left on standby can quietly add to your power bill.
- Switch off devices at the wall, including computers, kitchen appliances, and entertainment systems.
- Turn off lighting, heating, and cooling when rooms are unoccupied.
- Choose Energy-Efficient Appliances
When buying new appliances, check the Energy Rating Label. The more stars, the cheaper the appliance is to run.
You can use the Energy Rating Calculator to compare running costs before buying.
- Make Small, Energy-Saving Changes
Small swaps can make a big difference:
- Use a microwave or air fryer instead of an oven where possible.
- Keep fridge seals in good condition.
- Use lids when cooking to retain heat and reduce cooking time.
- Swap the clothes dryer for a clothesline when you can.
Smart Home Improvements for Lower Electricity Bills
Before investing in new appliances or major upgrades, make sure your home's building envelope includes the roof, walls, floor, and windows.
These areas should be performing well before you focus on other improvements.
Once your home is well sealed and insulated, every heating or cooling system will run more efficiently. Energy-efficient retrofits can then deliver even greater savings.
Make Energy Efficiency Work for You
Energy efficiency is not just about lowering your power bills. It is about creating a more comfortable, healthier, and cost-effective home all year round.
Whether you are upgrading a single room or improving your entire property, results depend on making the right choices about insulation, sealing, and home performance.
The best outcomes combine quality materials, correct installation, and a clear plan. Do it right the first time and enjoy lasting comfort and savings.
If you are ready to improve your home's energy efficiency, start with the essentials. Review your insulation, seal any draughts, and make smart upgrades to maximise results.
Contact us today for expert advice, no-obligation quotes, and customised insulation solutions that suit your home and budget.

6 Popular Types of Insulation for Australian Homes
Insulation is more than a building material. It's what keeps your home comfortable year-round and your energy bills in check.
Given Australia's hot summers and chilly winters, your insulation choices play a major role in how your home performs throughout the seasons.
Some insulation products excel at controlling radiant heat. Others focus on sealing gaps and determining airflow.
In this guide, we will explore six of the most popular insulation types for Australian homes, explaining how each one works and where it performs best.
Let's dive in.
1. Polyurethane Spray Foam Insulation
Polyurethane spray foam starts as a liquid and expands to form a solid layer, sealing every crack and joint as it hardens.
It fills tight cavities, wraps around pipes, and locks in place without leaving gaps.
Why spray foam is becoming more popular:
- Creates a continuous, airtight seal
- Lasts 50 years or more without sagging or movement
- Helps prevent condensation and draughts
- Made with lower energy consumption during production compared to other alternatives
Thanks to its long-term reliability, spray foam is now one of the most trusted choices for modern homes in Australia.
Read more: Open Vs. Closed Cell Foam – A Must-Read Comparison Guide
2. Reflective Insulation
Reflective insulation works like a mirror for heat. Made with foil layers, it reflects radiant energy away from the home.
It's most effective in hot regions and is often installed under metal or tile roofs. For improved results, installers combine reflective insulation with spray foam.
The foam seals air gaps, while the foil surface deflects heat. This combination reduces summer heat gain and keeps the home cooler for longer.
3. Batt Insulation
Batt insulation comes in thick, pre-cut panels made from fibreglass, polyester, or rockwool. These panels fit between ceiling joists or wall studs and have been a go-to choice in Australian homes for years.
Australian homeowners choose batts because they're budget-friendly and relatively simple to install.
But they're not without drawbacks.
Batts can shift, slump, or leave gaps, especially in older homes or irregular spaces. When this happens, performance drops and draughts can sneak in.
Before choosing batts, consider:
- Great for tight budgets and standard spaces
- Can lose performance if compressed or shifted
- Gaps may form in uneven or tricky areas
Learn more: Should You Top Up Your Roof Insulation or Replace It With New?
4. Blanket Roll Insulation
Blanket rolls are large, flexible sheets that installers roll out across ceilings or roofs. They're similar to batts but cover wider areas with fewer seams.
Builders often use them as a secondary layer of defence. For example, spray foam might be applied to seal everything tightly. Blanket rolls are laid over the top to increase thermal resistance.
Blanket rolls are helpful in new builds or renovations where open access makes installation quick and easy.
5. Rigid Board Insulation
Rigid boards are panels made from materials like polystyrene, PIR, or phenolic foam. They offer a high R-value per inch and work well in tight spaces.
Some boards have foil-facing to reflect heat, adding to their thermal performance.
Why some homes benefit from rigid boards:
- High insulation performance in a slim profile
- Ideal for narrow cavities or where space is limited
- Foil surfaces can boost radiant heat control
Boards need to be installed carefully to prevent moisture issues, and they aren't always the most eco-friendly option to produce.
6. Loose-Fill Insulation
Loose-fill insulation uses small fibres or granules, such as cellulose, fibreglass, or rockwool, that are blown into roof spaces, wall cavities, or underfloor areas.
Installers use a hose to fill every corner, making it ideal for retrofitting older homes with odd angles or narrow gaps.
Professional installation is essential because poor filling or settling can lead to patchy coverage.
Good to know:
- Great for filling awkward or irregular spaces
- Ideal for older homes or retrofits
- Needs regular checks to maintain performance over time
Which Insulation Type Is Right for You?
Choosing the right insulation depends on your home, climate, and what you want to achieve.
- For full coverage and long-term performance: Spray polyurethane foam
- For hot climates: Reflective foil insulation
- For affordability: Batts or blanket rolls
- For hard-to-reach areas: Loose-fill insulation
Every product has its place, but spray foam often delivers the best overall comfort, energy savings, and long-term value.
Always ensure your chosen insulation meets Australian standards and is installed by insulation experts.
The Smartest Investment for Your Home
The number of insulation products on the market can be overwhelming, and it's not always easy to know what will work best in your space.
While batts, boards, and reflective materials all play a role, spray polyurethane foam continues to deliver the kind of all-in-one performance modern homes need.
Upgrading your insulation isn't just about reducing your power bill. It's about creating a home that stays comfortable, feels solid, maintains and uses energy more efficiently.
Whether you're replacing outdated materials or starting from scratch, getting it done properly means better living conditions for years to come.
Read more: Insulation and draught proofing.
Ready to stop guessing and start insulating smarter?
Contact us today for expert advice, no-obligation quotes, and customised insulation solutions that suit your home and budget.

Cooler Rooms, Lower Bills: A Homeowner's Guide to Beating the WA Summer
WA summers can be brutal.
You flick the air con on first thing in the morning, and it stays on all day.
Then the next electricity bill lands, and you’re paying for it, literally.
But it doesn’t have to be that way.
If your home heats up quickly, the problem often starts in your roof space. Without proper roof and ceiling insulation, hot air builds above you and radiates into your rooms.
The result? Higher cooling costs and less comfort, right when you need it most.
Why Roof Spaces Overheat and Push Bills Up
Cooling can take a big slice of summer energy use in Australia, especially in WA.
A hot roof space radiates into rooms. Gaps and air leaks make it worse.
Seal the leaks, then insulate. That turns the roof space into a calmer buffer, so your air conditioner works less.
Quick Wins This Week
Small changes add up fast in summer.
- Set your split system between 25°C and 27°C. Each degree higher can save about 5 to 10% on cooling costs. Fans first, air con second. A fan costs roughly 2 cents per hour to run.
- Clean AC filters and book a service before the first heatwave. You’ll get better airflow and fewer faults on the hottest days.
- Shade sun-exposed glass. Close curtains and blinds during the day to block heat. External shade beats internal shade.
- Use your solar during the day. Pre-cool late afternoon if your home is well insulated. The cool lasts until the evening.
- Don’t drop the thermostat to “icebox.” It won’t cool faster; it only runs longer.
Five Upgrades That Pay Back for Years
Planning a few smart upgrades over summer pays back for years. Start with the building shell, then the gear.
- Seal and Insulate the Roof and Ceiling
Stop heat at the top so rooms stay cooler and the air con cycles less. Spray foam can seal gaps and insulate in one step where suitable.
- Add a Cool Roof or Reflective Coating
A lighter, reflective finish drops roof surface temperatures and slows heat gain.
- Improve Windows and External Shading
Block sun before it hits the glass with awnings, external blinds, or a pergola on west and north-west walls.
- Upgrade to Efficient Cooling with Simple Controls
Choose high-star units, use timers and zoning, and keep the set point in the mid-20s.
- Use Solar and Load Shifting
Run bigger loads during the day and pre-cool insulated rooms so the structure holds the chill.
Stay Cool and Cut Costs This Summer
WA summers are tough, but your home doesn’t have to trap the heat.
Start with the basics. Seal the gaps. Upgrade your roof and ceiling insulation. Stop radiant heat before it reaches your rooms.
Then build on that. Add a reflective roof coating. Shade west-facing windows. Use efficient cooling with simple controls. Run your solar during the day to power it all.
Each step helps your home stay cooler for longer and lowers your energy bills.
Not sure where to start?
Contact us for a free consultation and a tailored solution that fits your home and budget.
Related reading: compare roof insulation, underfloor insulation and roof and ceiling insulation options.

Roof and Ceiling Insulation: Best Options for Australian Homes
In Australia, roof and ceiling insulation is one of the most effective ways to improve comfort and cut energy costs.
Whether you are building, renovating, or upgrading, the right insulation can make a big difference in both summer and winter.
In this guide, we will walk you through the best insulation options for Australian homes in 2025.
You will also learn how to tell when your insulation needs replacing and why polyurethane spray foam remains one of the smartest choices you can make.
Why Roof and Ceiling Insulation Matters
Your roof space is one of the biggest sources of heat transfer in a home. In the summer, heat from the sun can quickly build up and radiate through the ceiling. In winter, warmth from inside your home escapes just as easily.
Without proper Roof and Ceiling insulation, your heating and cooling systems must work harder, which means higher energy bills and less comfort.
A well-insulated roof and ceiling can save you up to 45% or more on your heating and cooling costs. This is not just about saving money. It also helps keep your indoor temperatures steady and reduces your home’s environmental impact and improves your overall comfort in the home.
Choosing the Best Type of Roof Insulation
There are many insulation types available, including batts, rigid boards, and foil products. While these can be effective, they often leave small gaps that let air escape. They also rely on staples and tapes that can wear out over time.
Polyurethane spray foam provides seamless coverage, sealing even the smallest openings where air and moisture could enter. This ensures maximum efficiency and a longer lifespan compared to traditional materials.
Key benefits of spray foam insulation:
- Long lifespan of 50 years or more
- Adds structural strength and integrity to your home
- Reaches difficult areas for complete coverage
- Maintains performance over time
- Continues to Reduce energy bills well after installation costs are recovered
- Uses less energy in manufacturing compared to many other insulation types
Spray Foam vs Batts – Which Should You Choose?
Batts are a popular choice because they are affordable and relatively simple to install. However, they can leave gaps, especially in older homes with uneven roof spaces.
Spray foam is applied as a liquid that expands and hardens in place, creating a complete seal. This not only improves energy efficiency but also prevents drafts and moisture issues.
Read more: Open Vs. Closed Cell Foam – A Must-Read Comparison Guide
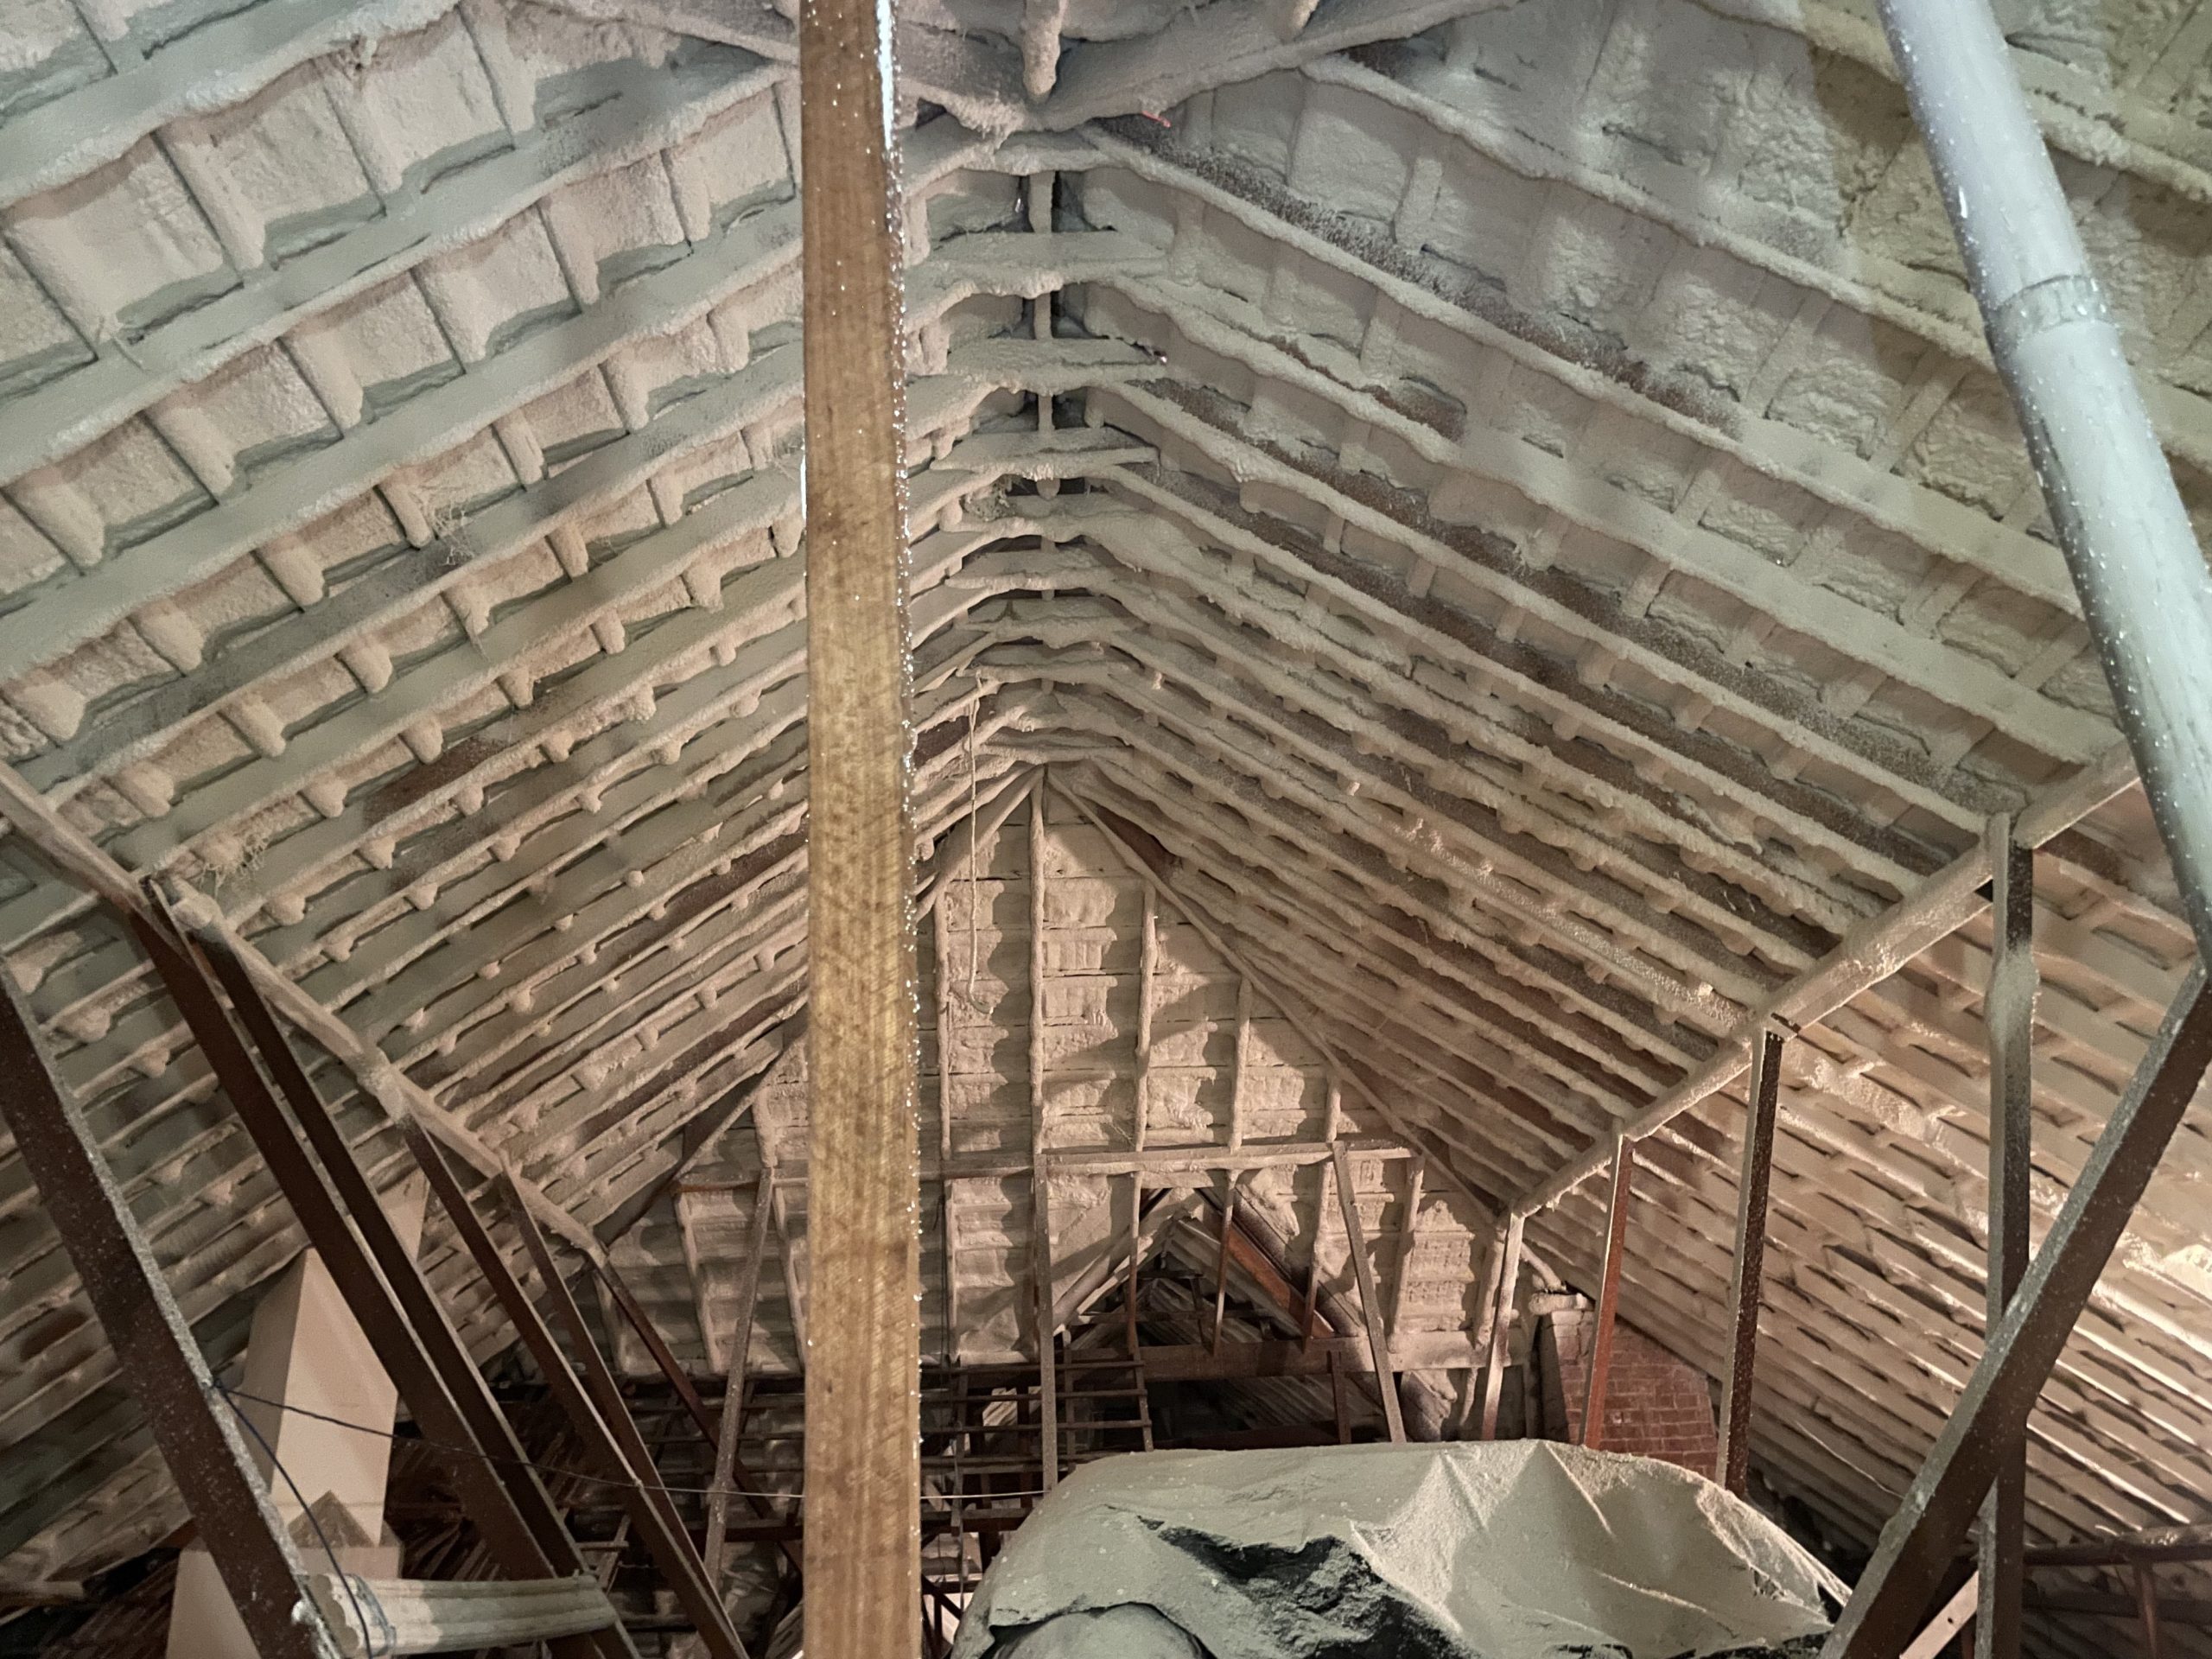 Is It Time for a Roof Insulation Check-Up?
Even good insulation loses effectiveness over time. If your home is more than 15 years old, or you have noticed higher energy bills and reduced comfort, it might be time for an inspection.
Signs you might have a problem:
- Uneven temperatures between rooms
- Rising energy bills despite similar usage
- Visible damage or deterioration in the roof space
- Draughts or hot spots in certain areas
Top up your insulation if:
- It is in good condition but has thinned out
- There are small gaps that can be filled
- It is free from moisture, mould, or pest damage
Replace your insulation if:
- It is damaged, damp, or mouldy
- There is a pest infestation
- It no longer meets energy efficiency standards
- You are planning major renovations
Read more: Top Up Your Roof Insulation Or Replace It With New
Safety, Compliance, and Professional Installation
Roof and ceiling insulation needs to be installed correctly to perform at its best. Always choose a contractor who follows Australian building codes and safety standards, including ICANZ and BCA requirements.
A reliable insulation contractor will provide you with product data sheets and clearly explain the performance, lifespan, and maintenance requirements.
Read more: Choosing the Best Insulation Contractor
The Smartest Investment for Your Home
Upgrading your roof and ceiling insulation is one of the smartest investments you can make for your home. Polyurethane spray foam offers a long-lasting solution that seals gaps, improves structural strength, and delivers maximum energy savings.
Whether you top up or replace your current insulation, getting it done right the first time means you will enjoy a more comfortable home, lower bills, and better efficiency for years to come.
Ready to stop wasting energy and start enjoying year-round comfort?
Contact us for a free consultation and a tailored solution that fits your home and budget.

How to Choose the Best Insulation Contractor
Choosing the wrong insulation contractor is like hiring the wrong tradie for an important job. It might seem cheaper or quicker initially, but when the work starts falling apart, you’re left fixing costly mistakes.
When it comes to insulation, poor workmanship doesn’t just look bad. It leads to energy loss, rising costs, and long-term damage that’s expensive to fix.
Cut corners, poor workmanship, and low-quality products can leave you with mould, draughts, and bills that just keep rising.
Whether you’re a builder managing a large commercial development or a homeowner looking to make your house more energy-efficient, working with an experienced insulation installer should make your life easier, not harder.
With over 30 years of experience across industrial, commercial, and domestic environments, we’ve seen the good, the bad, and the costly mistakes.
This isn’t a sales pitch about how good we are. It’s a practical, honest guide to help you avoid common pitfalls, ask the right questions, and choose an insulation contractor who gets it right the first time.
Make Sure They’re Fully Qualified and Registered
In Australia, there’s a big difference between someone handy with tools and a fully qualified insulation contractor. Don’t settle for “good enough.”
Look for an insulation contractor that is:
- Fully trained in insulation systems and spray foam applications
- Compliant with Australian building codes and safety regulations
- Experienced across a range of projects – not just new builds
An experienced insulation installer will understand how to meet ICANZ, BCA, and manufacturer specifications. They’ll also be up to date with the latest energy efficiency standards and know how to safely apply materials like polyurethane spray foam.

Look for Experience Across Sectors
Not all insulation installers are equipped to handle different environments.
Each project presents unique challenges, from marine and industrial sites to commercial buildings, agricultural sheds, and residential homes.
An insulation installer with multi-sector experience is more likely to manage risks effectively, adapt to site conditions, and meet performance standards.
Ask for examples of past work, and check if they’ve handled projects similar in scale and complexity to yours.
Ask About the Insulation Products They Use
A reliable insulation contractor should be transparent about the products they install and be able to explain their performance, compliance, and suitability for your project.
Here are a few helpful questions to ask:
- Do the products meet Australian standards and building codes?
- Are they suited to your local climate and building structure?
- How long do they last and how do they perform over time?
- Are they safe for indoor use and environmentally responsible?
You can also ask for supporting documentation. Many contractors provide access to technical data sheets and information about their insulation products so you can review material specs, durability, and safety.
Check Their Reviews and Reputation
Genuine customer feedback provides insight into their quality of work, communication, and professionalism.
When reviewing insulation contractors, look for:
- Verified reviews on platforms like Google
- Project photos or documented case studies
- Browse what previous customers have shared
Consistent feedback from real customers helps you gauge whether the contractor is experienced, responsive, and trusted by others.

Do They Offer Transparent Pricing and Practical Advice?
A reliable insulation contractor should be upfront about pricing and clear about what you’re paying for.
Look for insulation professionals who:
- Offer transparent, itemised quotes
- Explain potential variables that may affect final pricing
- Provide clear, jargon-free advice
A professional insulation team that takes the time to explain your options and answer your questions are more likely to prioritise long-term results over quick fixes.
Are They Fully Mobile and Easy to Work With?
A dependable insulation installer should be able to meet you where the work is.
Look for an insulation installer who:
- Are equipped to travel to your location
- Can accommodate different site conditions and schedules
- Maintain consistent communication from quote to completion
- Have experience working safely in active construction or retrofit environments
Whether the project is in a metro area or a regional site, mobility and flexibility are key.
Do They Prioritise Safety and Compliance?
Insulation installation involves more than just product knowledge. Safety and compliance are critical, especially when working with spray foam or on active job sites.
- A professional insulation contractor should:
- Provide safety data sheets for all materials
- Be fully insured with up-to-date public liability coverage
- Follow strict PPE and site safety protocols
- Coordinate with other trades to ensure a safe, efficient work environment
- Follow all relevant Australian standards, including ICANZ and BCA guidelines
Ensure your insulation contractor treats safety as a priority, not an afterthought.
Do They Educate, Not Just Install?
Insulation is a long-term investment; the best insulation contractors ensure you’re informed throughout the process.
Rather than simply turning up to do the job, they guide you through the pros and cons of different materials, explain how insulation supports energy efficiency and comfort, and clarify any ongoing care requirements.
A contractor who takes the time to explain compliance standards and energy targets shows a deeper commitment to quality outcomes.
Look for those who provide practical guidance through resources like detailed FAQS, helpful blog articles, and real-world case studies.
These tools are a good sign you’re working with someone who values transparency and long-term results.
Red Flags to Watch Out for When Assessing Insulation Contractors
While checking qualifications, pricing, and experience is essential, knowing what to avoid is just as important.
Common red flags include:
- Vague or inconsistent communication
- No visible evidence of past work or customer reviews
- Unusually low quotes that seem too good to be true
- Pressure to make a decision on the spot
- No documentation or unclear product details
A trustworthy insulation contractor will give you time, clear information, and the confidence to make an informed choice.
Choose Insulation Contractors Who Do It Right
Insulation is not just about lowering your energy bills. It is about creating a more comfortable, healthier, and energy-efficient environment.
Whether you are working on a residential renovation or a large commercial site, the outcome depends on who you choose to get the job done.
The right insulation contractor brings more than just tools. They bring experience, transparency, a strong safety record, and a commitment to getting things right the first time.
You want someone who will guide you through your options, ensure proper installation, and help you achieve long-term results.
If you are comparing insulation contractors in Perth or regional Western Australia, ask the right questions and look for a team that puts your needs first.
Ready to make an informed choice?
Contact us today for expert advice, clear answers, and a solution for your project.